The
concept of a model railroad version of all of Roundhouse
Park is something that has been
discussed on and off through the years as part of the plan for the Toronto Railway Museum
through it’s development. While not a
part of this conceptual project for the permanent museum, I have been working
on models of many of the pieces of equipment in the TRM collection. These models have been documented previously
in blog postings:
The
models have drawn compliments when displayed at shows as part of the museums
booth, or in the Temporary Stall 17 exhibition as part of temporary displays in
2012.
As
part of the process of working on the models, over the past couple of years,
I’ve been working on finding a way to display the models both in my apartment, at
the museum, and at shows when the TRM is in attendance. As can be seen, even including ½ the
Turntable requires a model that is 18” by 36”, which is a significant amount of
space to try and fit into an apartment, and bigger than can reasonably be constructed
working in an apartment workspace (Image 1 – Original Concept). Inspiration however, came from an unexpected
source, looking at the bookcases in our apartment, it became apparent that a
readily available shelf would provide enough room to model two stalls and a
portion of the patio big enough to display equipment on (and make it easily
stored in a bookcase when not in use!).
A $5.00 Ikea Inreda 22”x6-¼” bookshelf became the base of a revised plan
(Image 2 – Ikea Shelf design).
Knowing
that I would be attending the Ottawa Train Expo for the TRM which is followed
shortly by Doors Open Toronto and the museums busiest weekend of the year, I
wanted a way to display the HO Scale Models that would give visitors to these
events a sense of the models in the museum.
In early March 2013, a trip to Ikea resulted in the acquisition of a
spare shelf, and a project started with less than 2 months to the Ottawa show. As seen in image 3, the first step was to
take a printout of the plan and start mocking up the location of track and the
inspection pits inside the walls to confirm everything would fit as designed. The walls would be constructed using a
variety of materials including strip basswood, styrene strips, and styrene
cinder block sheets. As seen in Image 4,
the stall doors were constructed with grooved basswood sheet and styrene shapes
to represent the metalwork on the doors.
Image 5 shows the rear walls of the stalls being formed with styrene
frames, which would hold the windows and eventually be covered by Styrene Brick
sheets.
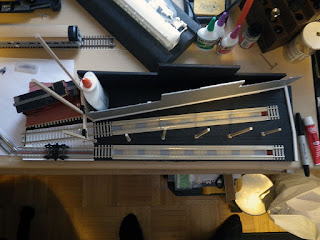
The interior structure of the roundhouse would be simplified in the roof for the purposes of making it easy to access and more visible to viewers. A quick visit to the roundhouse to cut slots for the inspection pits and drill holes for the interior columns with the drill press, and the model could start being put together in earnest. Image 6 shows the wall of Stall 15 and the doors being test fit together along with the inspection pits. Image 7 shows the completed inspection pits in the floor with all the rails in place. Once the pits were painted they were installed and work commenced on cutting styrene brick sheet to fit between the rails on the patio. Track 16 includes the 7.5” Miniature Railway track as the real roundhouse features. To model this, 3mm T-Gauge track (used with models at 1:450th scale, compared to 1:87th for HO), a gauge commercially available in Japan was acquired to allow models of the miniature railway to be displayed as well. For the concrete floor of the Stalls, lightweight drywall compound provides the perfect texture appearance, is easy to work with and doesn’t run from where you lay it. Two reasonably thin applications built up the height to allow for fine adjustments to create a floor that’s almost as flat as the real one as shown in Image 9.
Click here to read part 2 of this series of postings.
Posting and photos by Stephen Gardiner
Click on each image for a closer look!
 |
| #1 - Original Stalls Model Sketch |
 |
| #2 - Final Stalls Model Plan |
 |
| #3 - Checking the Plan on the Board |
 |
| #4 - Building Doors |
 |
| #5 - Building the Walls |
 |
| #6 - Test Fitting Walls and Pillars |
 |
| #7 - Inspection Pits and Track in Place |
 |
| #8 - Laying Patio Brick |


<< Home